Saturday, October 4, 2014

Sparkle with Prima - Lulupu Blog Hop

Hi All!


You must have reached my blog via Shilpa Nagaonkar's blog! Else please click HERE for the complete list of the hop stops or to start the hop from the top..

Welcome to day 2 of Lulupu "Sparkle with Prima" Blog hop! I am super excited to be a part of this month long celebrations organized by Lulupu team to celebrate all the Indian festivities with new Prima products now available at Lulupu Craft store.

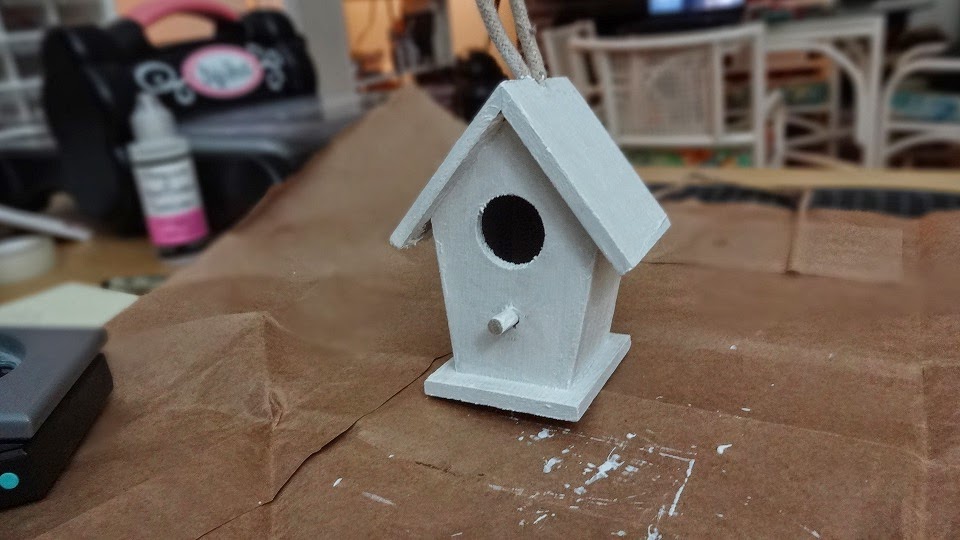
When Lulupu team invited me to be a part of the hop, I was super excited! I knew that this time, I have to move out of my comfort zone and try something new. I decided to alter this cute wooden bird house which I was hoarding for a long time!


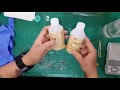
I first coated the whole house with white Gesso to create the base..


Then I mixed pink perfect pearls from Lindy's Stamp Gang into Gesso as I wanted a pink shabby chic look..


This is how it looked after 2 coats (White base + Pink color coat)..


Now I started decorating the birdhouse.. First is the roof, I cut few 1 inches strips of prima paper pad..

Then I trimmed these down into the size of the birdhouse's roof.. I used my scallop edge punch and distressed the edges with Walnut stain distress ink..


I carefully glued these strips on top of each other to create a typical roof structure.. I seriously loved the final outcome of this step..


I used some Prima vines to give it a birdhouse in the garden look.. :D :D


After adding vines, I used some flowers, rhinestones, pearls and a hello diecut from my stash to complete the project..  Simply in love with the shabby chic look of this birdhouse..


Here is the complete look of the project in better lights and setup.. :)


I also brushed vines and flowers with pink Gesso I made to give it a more worn out look and blend in the embellishments together..


I hope you guys will like this project.. Do leave some love as it makes me super happy!

and don't forget to play along the hop and the challenge.. you can find all the details here.. your next  stop will be Pallavi Iyer.. A super talented crafter!

Have a good day!
- Priya  

Wednesday, September 3, 2014

Winnie & Walter "Share the love - Simon Says Stamp' Part 1

Hello friends,

Recently, i got a chance to shop at Simon Says Stamp that carries all of the products from every card maker's wishlist. When I saw that Winnie & Walter is Featuring SSS products, I was sure that I will cook up something as I bought my very first W&W stamp set. I am simply amazed with the quality of W&W stamps and the solid impressions they give.


I hope I will be able to participate in their all 5 challenges. That's why I have ended my blog post name with "Part 1". :D I have made 2 cards so far that fits into their 3 challenges. Wish me luck!

I will share both cards here as these are kind of inter-related. I will tell you how.

I have never created any card with Rainbow color palette. This is my first try with all the rainbow colors. I used various distress inks to create the rainbow colored Mosaic heart.

As they say you learn from your mistakes. But here I learnt from my messy craft table. My initial plan was to pop out the butterfly out of stenciled heart. But stupid me, I placed the colored heart panel after die cutting SSS Paulina butterfly on misted distress inks which I kept to create another card. The water seeped into CS and spoiled the right side of the heart. Either I could throw the panel into dustbin or use some creativity. I went for second option and I loved the outcome.. :D

1st Card : I cutout the right side of the card which was spoiled and came up with the below card. Backed the panel with the PTI dotted Pattern Paper.Covered the butterfly window with the equally sized SSS Devonshire Butterfly. Added the bold and beautiful sentiment from W&W "The big, the bold and You" stamp set. Lovely!


2nd Card : Since my rainbow mosaic butterfly die cut was ready, I was able to quickly whip up my second card. Die cut the Paulina Butterfly 2-3 times and glued these together and adhered on Kraft CS. The sentiment was heat embossed and needless to say, it's from the W&W "The big, the bold and You" stamp set. I kept it simple so that the focus is on the butterfly.


I also covered the mosaic tiles with Glossy Accents to make the butterfly shine! Here is a close up..


Supplies Used :

Stamps : Winnie &Walter  "The big, the bold and You" stamp set
Cutting dies: Simon Says Stamp Devonshire and Pauline Butterfly
Stencils : Simon Says Stamp Mosaic Heart
Card Stock : PTI Perfect match Cardstock Sampler

Challenges Entered :
Card 1:
1. Winnie & Walter - Rainbow Colors with SSS Products
2. Simon Says Stamp - Wednesday Challenge - Anything Goes
3. Scrap it Girl - Monthly Challenge - Stencils or Masks

Card 2:
1. Winnie & Walter - Rainbow Colors with SSS Products
2. Winnie & Walter - 10 Minutes Dash Challenge with SSS Products
3. Simon Says Stamp - Wednesday Challenge - Anything Goes
4. Scrap it Girl - Monthly Challenge - Stencils or Masks
5. Daring Card Makers - Clean & Simple

Sorry for the long post but I wanted to share my craft story and the feeling of accomplishment I felt with the end results.

Have a good one!

- Priya

Double Stencling!

Hi All,

Quickly sharing the card I made made using my stuff from Simon Says Stamp and Mama Elephant. This is a quick card I made in 10 mins flat. Seriously, I think this the quickest card i ever whipped up!

I used the tiny hearts stencil first and used various distress inks to create the heart background. Then I used the balloon stencil and lightly inked the stencil so that the background sees through. Love the bunch of overlapping balloons.


Supplies Used:

CardStock : PTI Perfect Match CS Sample, Neenah White
Distress Inks : Picked Raspberry, Peacock Feathers and Mustered Seeds
Stencils : SSS Balloons and Patterns
Stamps : Mama Elephant Make a Wish
Others : Recollection Enamel Dots

Entering the card to following Challenges :

1. Simon Says Stamp - Wednesday Challenge - Anything Goes
2. Simon Says Stamp - Work it Wednesday

Have a great day!

- Priya

Sunday, August 24, 2014

Sequin Shaker birthday card + Pretty Pink Posh Blog Hop!

Hi All!

Today I am participating in "Cutting Edge Blog Hop" hosted by Pretty Pink Posh, for those who love die cutting... and I am one of them..


Here is my card I made for the hop. I made a birthday Shaker card using my favorite dies (Spellbinders Label 8) to make shaped card. Those who follow me would know I love the shape so much!:


A view from the side :

I locked the sequins using acetate and double sided foam tape. So when you shake the card, the sequins move around. I am sure kids will love it. Like I did! I had a difficult time yesterday deciding on the pattern papers to choose.. finally I picked my choice.. all papers are from different paper pads of different brands.. I matched the MS cupcake chipboard with the dotted PP from MME..

Here is the list of supplies I used :

1. Cutting Dies : Spellbinders Label 8 nesting dies for card base and sequin frame. PTI Birthday Die
2. Cupcake Chipboard : MS Modern Festive Collection
3. Papttern Papers : Mix of My Mind's Eye
4. Sequin : From Stash

Thanks for stopping by!
- Priya

Saturday, August 23, 2014

Stretch Your Stamp Class Last Takeaway

Hi All!

Sharing another card I made with my learning from SYS Online Card Class. I simply adored the card made by Yana Smakula, from guest faculty using paper smooches stamps and masking.

Here it is,


I did some masking as taught by Yana. Loved the colors on the Kraft paper. I so wanted to try embossed die cutting which is trending now a days. After all the stamping, I cut "Hello" sentiment using cutting dies. After that I cut 5-7 "hello" die cut using black cardstock, stacked and glues all the die cuts together keeping the stamped die cut at the top. This will give you a sturdy chipboard shaped "Hello" die cut.

See, how thick it is.. I deliberately used black cardstock so that the diecut pops out a little.


I hope you guys liked it.

Supplies used :

1. Stamps : Paper Smooches Botanical 2
2. Dies : Avery Elle Hello Die
3. Inks : PTI Smoking Shadow, Raspberry Fizz, Scarlet Jewel and Enchanted Evening Ink Cubes
4. Cardstock : PTI black and Kraft Card stock.

Challenges Entered :

1. Paper Smooches - Anything Goes (Ends 23rd Aug)

2. Penny Black All Sorts  - Anything Goes (Ends 3rd September)
3. Stamping Sensations - Anything Goes (Ends 3rd September)
4. Brown sugar challenge. - Let's get Krafty

Thanks for Stopping by and have a great day!

- Priya 

Tuesday, August 19, 2014

"Getting to know me" Blog Hop!!


Hello Friends!

This is my third and last post for today and it's gonna be a lengthy one.. :D

So my dear crafty friend Sharada Dilip Acharya tagged me in a very unique blog hop which is here on the bloggy land for quite a while. I bumped into her one fine day at a craft expo and was very impressed by the versatility of the crafts she can do.. scrapbooks, cards, photoframes, gift bags & boxes, handmade gifts and decor items.. wohhh.. the list is endless.. and since then we are a true patron of each other's work.. Thanks for tagging me Sharada..

As the name suggest, in this blog hop post I will tell something about my work and the process it involves.. and also answer few questions so that you get to know me.. I think this is the perfect time to have this post as I am back to blogging after a long break and would love to meet new crafters on blog land and say Hi! to my oldies :D.. as many crafters in this hop did, I will also keep posting my work's snapshots to make it more interested..

"Hello! Meet me.. while crafting... :)"

1. What am I working on?

"Two tone Roses"
Right now I am working on a bulk of cards using PTI stamps and dies.. Here are my stamped and die cut flowers that I will use on my cards... Two tone roses.. Pretty! Isn't it? I must have made atleast 50 of these!

2. How does my work differ from others of its genre?
"did you get my style?"

That's a little difficult question as I never tried to compare my work with others. I am more of a freestyle crafter who loves to try out new products, styles, techniques.. I each one has it's own sense of coloring, styling, design and the main driving force behind the creation.. Everyone is unique.. everyone should learn from each other to enrich their knowledge..

3. Why do I write/create what I do?
"Sharing is caring.. :)"

I think blogging is a fantastic way to journal your crafting adventures and to share those with fellow crafters.. and to have an audience to witness your journey is like a cherry on the cake..

4. How does your writing/creating process work?

"Well a CAS card ended up in this 3D box card.. :P" 

My creating process is not defined actually. Anything can trigger me to craft. It can be a new product in the market or it can be for the sake of killing time. I first try to sketch the final results either in my mind or in my craft notebook. Then I move on to choose my color palette and then dive into my stash to see if I have enough material like embellies, CS, pattern papers from color palette selected. and sometimes while going thru my stash, I might select completely different colors and end up making a completely different project than what I planned initially!! Hahah! This is bliss! as my job doesn't allow me to alter my thought process.. :(

Alright! That's about me! If you have any questions to ask.. please feel free and leave a comment!

To keep the hop going, I would like to tag 3 very talented crafters who needs no introduction!

1. Kavitha : Yes! very famous, Simply Mangolia DT member and owner of Bits an' pieces-Paper boutique. I know here from the very beginning of my crafting journey. Infact, I placed my first online order of paper craft material with her before I started blogging. I think that was a pack of die cuts and embossed papers.. :D 

2. Bhavana : It was such a good crafty time I had with Bhavana in Bangalore among craft expos, workshop and crafty hangout! She has such a unique style of Clear and Simple cards and seriously, she knows her job too well. Check out her new YouTube Channel to learn card making in a super easy way. I simply love her videos as it's quick and to the point without jibber jabber..

3. Pallavi Iyer - I meet her one fine day online and simply fell in love with her unique style. She has excelled in Mixed Media Art and Sketching already and I am sure she will come out of her phobia of card making and will be our kristina werner one fine day. Yes! You can do it Pallavi!!!

Do check out their blogs coming Tuesday to know more about them..!
 Have a happy and crafty day friends!

Love,
Priya

Papertrey Ink - Sweet Life

Alright Peeps,

I am super exicted to share this card of mine. I was finally able to lay my hands on PTI stuff and oh boy! I am completely blown away by the quality of their inks, stamps, CS, designs... in short everything! Even the packing was done so neatly and with lots of love and care.. I have to confess, the PTI CS is of the top most quality as compared to the other brand I have worked with during my entire crafting journey.. 3 years!

Check out my first card I made with PTI stamp and die set - Sweet Life. It's such a versatile stamp with such b'ful roses. This is suitable for beginners as well as stampers who has already mastered the stamping techniques. One can choose the level of stamping from single level to three level. I went with 2 level stamping. I stamped roses in the shade of pink. Then with darker shade, I stamped the rose shadow stamp with darker color.. and the final impression is so b'ful.. isn't it?


Challenges entered :
1. Penny black at all sorts - Anything Goes - (ends 3rd Sept.)
2. Sir stamp alot challenge - Anything Goes  - (ends 3rd Sept.)
3. Kraft Zone - CAS - (ends 30th Aug)
4. simonsaysstampblog - Anything Goes (Monday challenge)

Supplies Used :
1. Card Stock :Neenah White, PTI Classic Kraft
2. Stamps and Dies : PTI Sweet Life
3. Inks : PTI Hibiscus Burst, Scarlet Jewel Cube, Simply Chartreuse 
4. Enamel dots from my stash

This is it for today. Have a great day!

Love,
Priya

Stretch Your Stamps - Word Search Technique


Hi All!

Today I am sharing another card I made after learning new techniques called "Word Search" at Stretch your stamps. This is a fantastic way to use your alphabet stamps. Have a look.


 Firstly, stamp your main sentiment and then align random alpha stamps on your acrylic block in a row. and then stamp it around the main sentiment. Stamp press or stamping block with gird lines comes very handy to align the stamps correctly with the main sentiment.
I gave another twist to the technique. Since the sentiment starts with 'you', I stamped the alphabet 'U' separately with red colored ink. 
Easy peasy! I love this Milo ABC stamp set from Lawn Fawn. Font is classy and neat. Another gr8 thing with this stamp set is that it usually has 2-4 stamp of each character so that you don't run out of alphas while stamping your sentiment. 

Challenges entered :
1. Kraft Zone - CAS - (ends 30th Aug)
2. simonsaysstampblog - Anything Goes (Monday challenge)

I hope you guys will like it. Please leave some feedback.. :)

Love,
Priya

Monday, August 11, 2014

Faux Watercoloring - Bricked Backgroud

Hi All,


Quickly sharing another card I made as a homework at OCC - Stretch Your Stamps. I used the same water coloring on reverse background technique but this time created a bricked background instead of tiled one.

Have a look :


Here is the watercolor paper before I started creating bricks out of it. Brick size is 1.25 x .5 inches. After cutting out, I distressed each brick piece with Frayed Burlap distress ink. It was quite difficult to keep all the pieces of paper together so keep intact the stamp design. It was like a jigsaw puzzle! :D


Here is the list of supplies I used :

1. Cardstock : Neenah Solar white 110 lbs
2. Stamps : Justrite Cling Background - Rose Garden, Paper Smooches Bold Buzzwords
3. Distress Inks, Prima Flowers and Kaisercraft Rhinestone crystals
Have a great day!

Priya

Thursday, August 7, 2014

Stretch your stamps - Day 1 - Faux Watercoloring with Reverse Stamps

Hello Peeps!

How are you doing today? So I have joined my first ever Online card class which is Stretch your stamps. I really liked the concept and finally bought a seat. Seriously, all the girls at OCC really know their job. Each day is filled with lots of techniques and tips.

So on the first day, one of the technique they taught is 'Faux Watercoloring with Reverse Backgroud Stamps'. A reverse background stamp is the one which has lot of stamping area.

Here is the card I made for me. And I really loved the complete outcome. Have a look.


I used the leftovers from glittered 'hello' diecut and glued it to the body of butterfly to highlight these cuties and to spread a little gold to the upper part of the card for an even look.

I am loving the glitter paper which I was hoarding for a long long time and finally put it to use. Have a closer look.


Supply list :
1. Cardstock : Neenah Solar white 110 lbs
2. Stamps : Justrite Cling Background - Rose Garden
3. Dies : Avery Elle Simply Said Hello
4. Glitter Paper and Butterflies are from Itsy Bitsy India

Challenges Entered :

1. Simon Says Stamps - Make it Sparkle

I hope you guys will like it.

Thanks for stopping by!
- Priya

Thursday, July 31, 2014

Play with pattern papers!

Hi All!


*** Check out my Giveaway on my FaceBook Page. Closing on 08/03/2014 at 12 PM EST ****

I am back again with another post to show a set of 3 cards I made yesterday from a single piece of 12x12 pattern paper. Since the pattern paper was for creating layouts, I was hoarding it for so long as I don't do scrapbooks and the birdies and colors were so cute! So I whipped up an idea of making 3 cards altogether as I cannot let such a beautiful paper go waste!

Here is the set of cards :


Now individual pics :
1. Tall card : I had a pretty tough time in aligning the birdies with negative die cut area and sticking it to the base of the card as the birdies were spread across the pattern paper. I guess I managed somehow.


2. Shaped card: Those who follow my crafting, they would know by now that It's my favorite shape. On the patter paper is from Recollections - Fabulous Girl paper pad. The little birdie die cut sentiment is from K&Company. Also added some enamel dots to enhance the color palette I used here and did some faux stitching to outline the design.


3. Heart Shaped Easel Card: 
How can I separate 2 birdies sitting together!!! I had to use them together, A heart shaped card was just perfect for these birdies and they looked so much in love. :D Added a "tweet" sentiment too!

And now a picture of the PP I used to make these cards. Sorry for the bad picture, I clicked the photo when I already started with the cards.


I am not able to recall Brand names for the card stock and enamel dots used here. Dies are from Spellbinders except the mini cloud which is from Greeting Farm Company.

Challenges Entered :


I hope you liked these cards. I just loved making these.

Thank for visiting,
Have a lovely day!

Priya 

Thursday, July 24, 2014

CAS(E) this Sketch!

Oh my gosh!!

It's almost a year I am missing on blog land but I have not stopped crafting! Hopefully I will keep updating my blog from now on.. :D You can check my FaceBook page here for all the crafting I did lately.. 

Alright, I have a card which I really want to share with you all. I wanted to challenge myself and try some different from my usual style.. So here it is, a CAS card based on the sketch. 

The Sketch :


The card :

another view :


I hope I was able to execute the sketch successfully.

The clouds stamp and die is from 'Greeting Farm' company. I was hoarding this set for so long and was itching to use it now. I used the negative die cutting technique and adhered a scrap of pattern paper at the back. Then I inked the mini clouds, rain drops, hearts and the sentiment using Hero Art's shadow ink cubes and assembled the card.. and tada! it's done!

Supplies used:

Cardstock : Neenah's solar white
Stamps and dies : Mini Clouds from The Greeting Farm Company
Inks : Hero Arts Quiet Morning and Summer Splash Ink Cubes Pack
Embossing folder : Cuttlebug Swiss Dots
Other tools : Bigshot die cutting machine, We Are Memory Keepers Corner chomper

Challenges entered :


Please leave some comments. it's fun reading all the comments I get on my cards.

Hugs,
Priya